RFID viewer Demo with Processing GUI
28 Apr


Posted By
0 Comment(s)
3167 View(s)
Updated: 4/28/20
You can now view your Identification or ID using Processing GUI.(see the image below).
Of course you need to modify the Processing sample sketch, if you want to know how?.
Continue Reading this blog!
Processing is a flexible software sketchbook and a language for learning how to code within the context of
the visual arts. For more information Visit their website @ processing.org.
GUI (Graphical User Interface) is a system of interactive visual components for computer software. A GUI displays objects that convey information, and actions that can be taken by the user.
Downloads:
Mine, I'm using the Stable Release Processing 2.2.1
RFID viewer Demo REPO from e-Gizmo Github
1 - RFID Card reader 2
2 - RFID card 125Khz
1 - GizDuino SE
1 - USB cable
4 - 1pin Jumper wire M-F 20cm
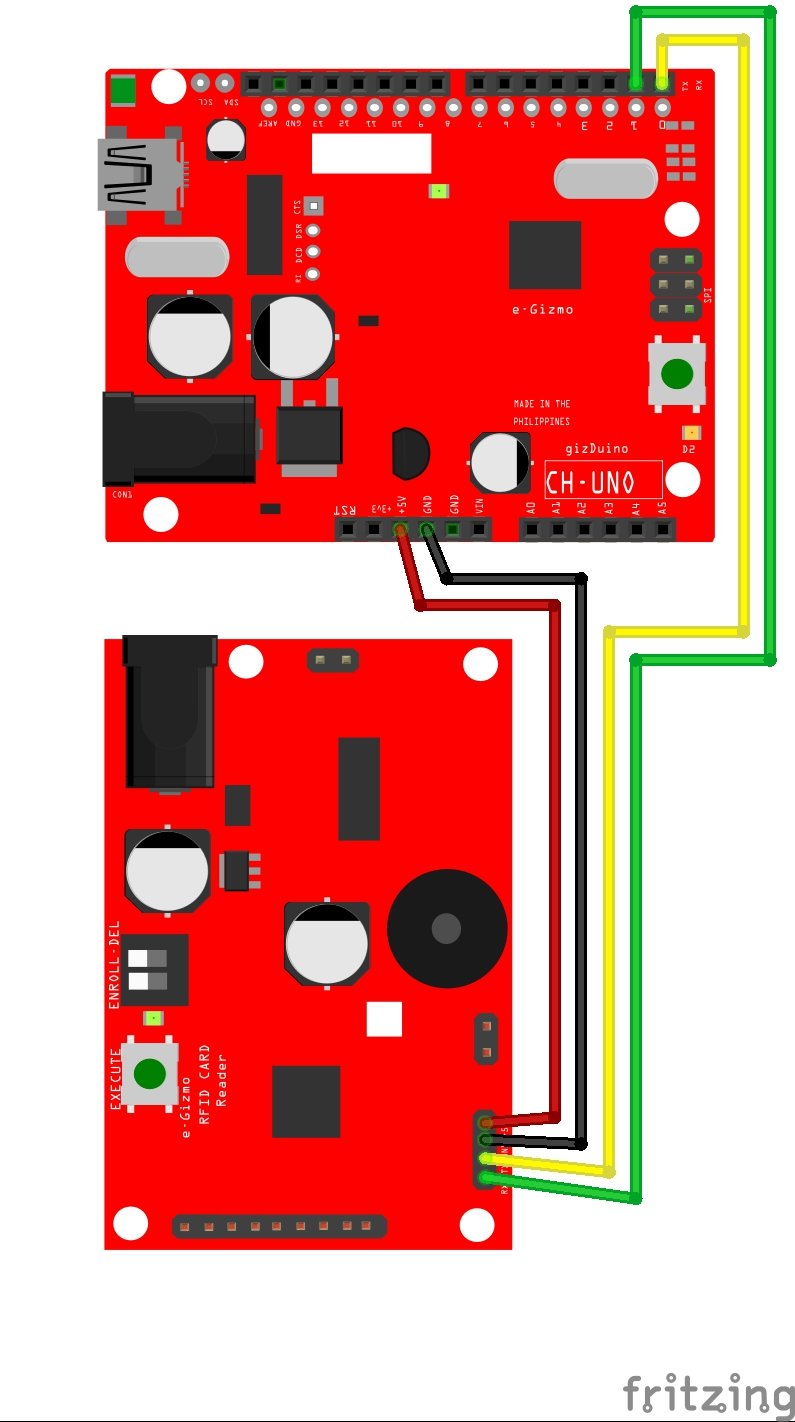
GizDuino SE to RFID reader connections
5V to +5V, GND to GND, RX/D0 to TX, TX/D1 to RX
Open the RFIDreader.ino
Select the Arduino UNO/Genuino Uno board.
Select the COM PORT.
Before uploading the sketch, Kindly pull-out the wire in RX/D0 of gizDuino SE then place it again after the uploading. (RX/D0 pin and the CH340 driver are connected to ATMEGA328 IC that is why you need to unplug the jumper wire to avoid unnecessary errors, OK?)
Then Click Upload.
Open the Serial Monitor. and Tap the RFID Card. The Serial Number will display on the terminal.
Baudrate: 9600bps
Open the RFID_using_processing.pde
Before you RUN the skecth. Modify the COM port number and the String ID (Card Serial Number 10-digits).
Change also the String Num for Username according to the user id card.
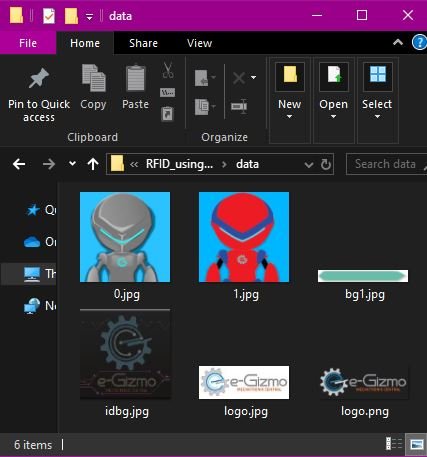
Next, What's inside the data folder?....(.jpg files)
Picture size must be 300 x 300 px dimensions also the extension format .jpg (not .JPG) and same file name.
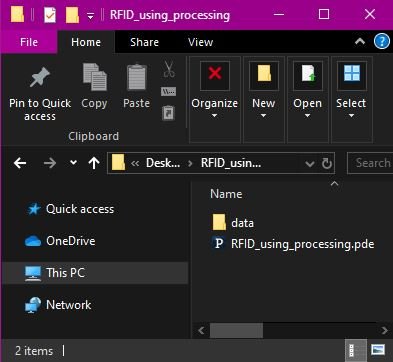
Then add the 'data' folder inside the RFID_using_processing folder.
HINT*You can add more users by adding more ID serial number, modify the SerialEvent functions on the sketch and add more jpg photo/image inside the data folder. Enjoy!
You can now view your Identification or ID using Processing GUI.(see the image below).
Of course you need to modify the Processing sample sketch, if you want to know how?.
Continue Reading this blog!
An Open Source GUI... The "Processing"
Processing is a flexible software sketchbook and a language for learning how to code within the context of
the visual arts. For more information Visit their website @ processing.org.
GUI (Graphical User Interface) is a system of interactive visual components for computer software. A GUI displays objects that convey information, and actions that can be taken by the user.
Downloads:
Mine, I'm using the Stable Release Processing 2.2.1
RFID viewer Demo REPO from e-Gizmo Github
Materials:
1 - RFID Card reader 2
2 - RFID card 125Khz
1 - GizDuino SE
1 - USB cable
4 - 1pin Jumper wire M-F 20cm
Wiring Diagram
GizDuino SE to RFID reader connections
5V to +5V, GND to GND, RX/D0 to TX, TX/D1 to RX

Arduino
Open the RFIDreader.ino
Select the Arduino UNO/Genuino Uno board.
Select the COM PORT.
Before uploading the sketch, Kindly pull-out the wire in RX/D0 of gizDuino SE then place it again after the uploading. (RX/D0 pin and the CH340 driver are connected to ATMEGA328 IC that is why you need to unplug the jumper wire to avoid unnecessary errors, OK?)
Then Click Upload.
Open the Serial Monitor. and Tap the RFID Card. The Serial Number will display on the terminal.
Baudrate: 9600bps
Processing
Open the RFID_using_processing.pde
Before you RUN the skecth. Modify the COM port number and the String ID (Card Serial Number 10-digits).
Change also the String Num for Username according to the user id card.
Next, What's inside the data folder?....(.jpg files)
Picture size must be 300 x 300 px dimensions also the extension format .jpg (not .JPG) and same file name.

Adding the DATA folder.
Then add the 'data' folder inside the RFID_using_processing folder.
Now Click RUN. to see the result.
Demo Video:
HINT*You can add more users by adding more ID serial number, modify the SerialEvent functions on the sketch and add more jpg photo/image inside the data folder. Enjoy!


Leave a Comment